 Freelance
Traveller
Freelance
TravellerModifying Minatures for Traveller
This was the featured article in the April/May 2015 issue.
In my many years of being a player and a game master I have found that using miniatures is helpful. It helps players see what is going on and where characters are in relation to each other and of course to the opposition. There were occasions when area affect damage was debated by characters suddenly saying they were not in the effect zone and then arguing over what was said and what was meant. Sometimes this is the player trying to protect his character, sometimes it is poor description by the game master. Whichever, miniatures have been a staple at my games for over 20 years.
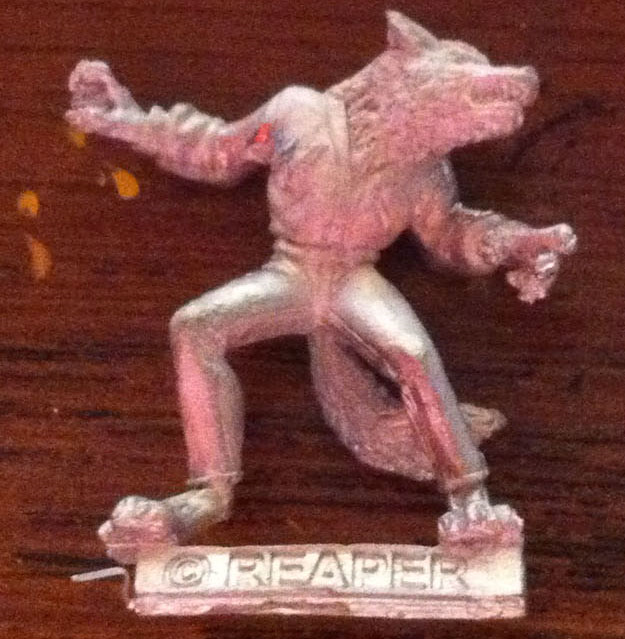
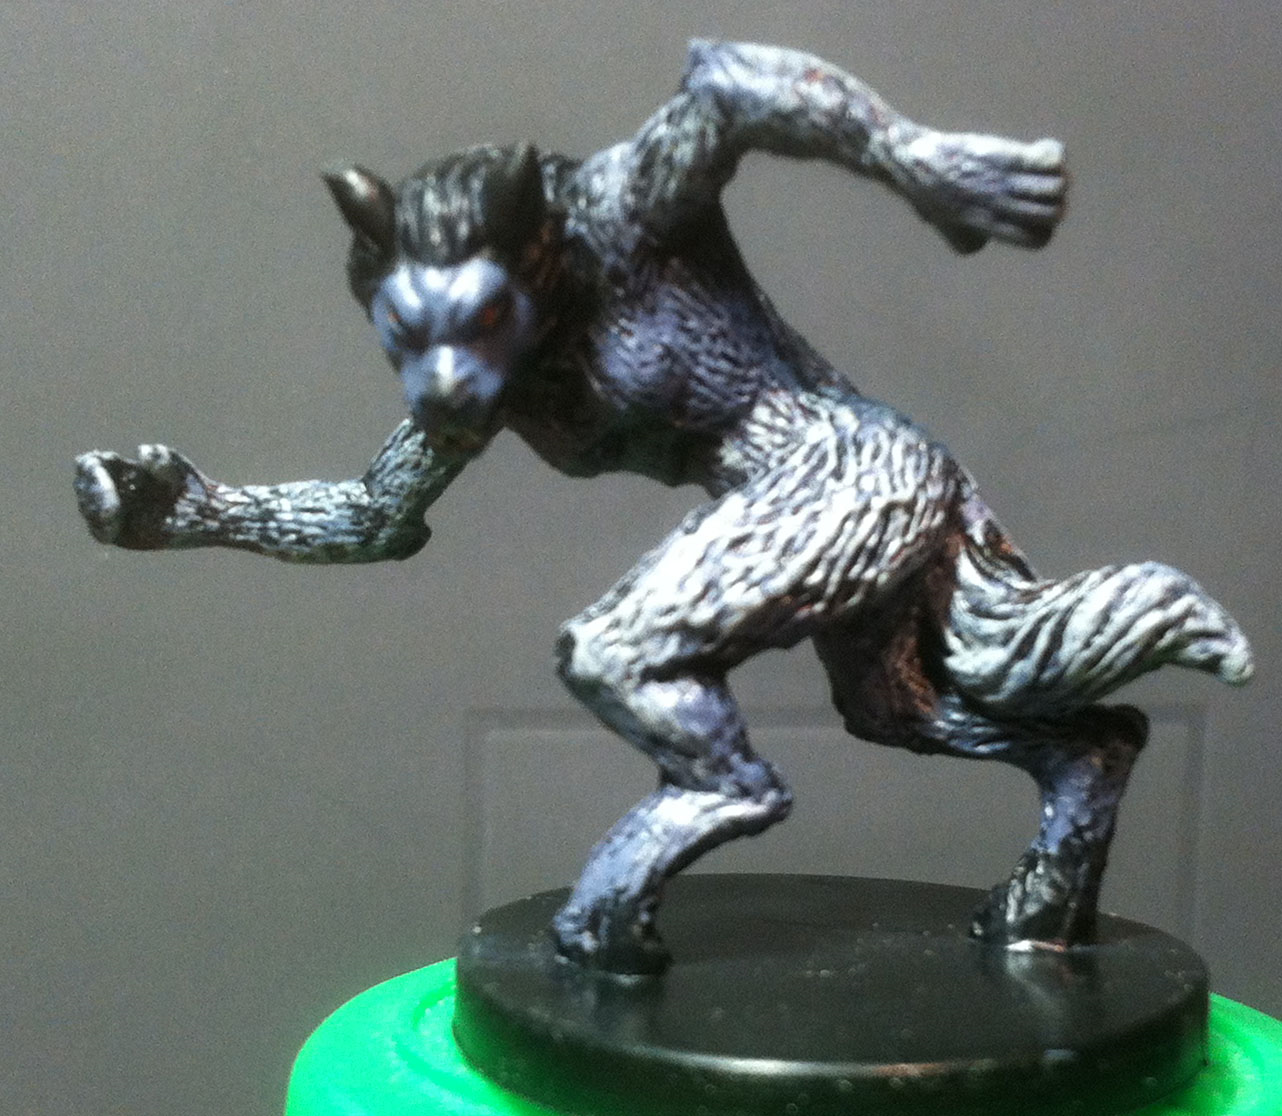
Unfortunately there is not much in the way of miniatures for Traveller. Back in 1983, Grenadier produced several box sets of miniatures for Traveller, and RAFM produced the odd space character here and there. There are some companies that produce space-based miniatures in the 25/28mm range: Reaper Miniatures (the Chronoscape line), Victory Force Miniatures, and Hydra Miniatures (to name a few). However, these lines are only useable if you want to play a human, at least as one of the major races. This leaves only the option of playing humans only, trolling eBay looking for pieces (you can search with “Grenadier Traveller” and usually get a hit every week), or taking matters into your own hands.
 In
this article I will show how I converted the werewolf from the Dungeons
and Dragons Giants of Legend release into
a gun-toting Vargr (left), and Tommy the Wolf Man from Reaper Miniatures
(right) into a sword-wielding Vargr. Both are a little large for the
true 25mm scale in which the Grenadier Vargr were cast, but then, most
miniatures these days are 28mm scale and some push the 30mm envelope.
When you compare them to the ‘original’ miniatures it is very
noticeable, but you can always get around it by saying some characters
are larger than the race average.
In
this article I will show how I converted the werewolf from the Dungeons
and Dragons Giants of Legend release into
a gun-toting Vargr (left), and Tommy the Wolf Man from Reaper Miniatures
(right) into a sword-wielding Vargr. Both are a little large for the
true 25mm scale in which the Grenadier Vargr were cast, but then, most
miniatures these days are 28mm scale and some push the 30mm envelope.
When you compare them to the ‘original’ miniatures it is very
noticeable, but you can always get around it by saying some characters
are larger than the race average.
To make the conversion you will need several tools and supplies. For tools you will need an X-Acto knife, small smooth pliers, clay molding tools (at least the pick and the small flat paddle), small files, a small hand drill, and a small wire cutter. For supplies you will need a small paperclip, some superglue of some kind, and green stuff (modeling putty—yes, it’s really called “green stuff”). Most of these items should be available in your local gaming shop, but you may find the tools cheaper if you shop around at hobby stores (e.g., RC stores, or Hobby Lobby).
 For
the potential I saw in the werewolf, the first thing I wanted to do was
reposition the arms a bit. This is one of the easiest things to do when
the mini is plastic. I cut the arms off at the elbow using the knife. I
also trimmed most of the creature’s mane off that was flowing down the
back. Then I used the hand drill to make a hole up each arm. I cut off a
piece of paper clip and then glued the metal into the arm. This is
needed so that you can ‘pin’ the arm into the new position. I then test
fitted the lower arm to the position I wanted and drilled new holes into
the forearms.
For
the potential I saw in the werewolf, the first thing I wanted to do was
reposition the arms a bit. This is one of the easiest things to do when
the mini is plastic. I cut the arms off at the elbow using the knife. I
also trimmed most of the creature’s mane off that was flowing down the
back. Then I used the hand drill to make a hole up each arm. I cut off a
piece of paper clip and then glued the metal into the arm. This is
needed so that you can ‘pin’ the arm into the new position. I then test
fitted the lower arm to the position I wanted and drilled new holes into
the forearms.
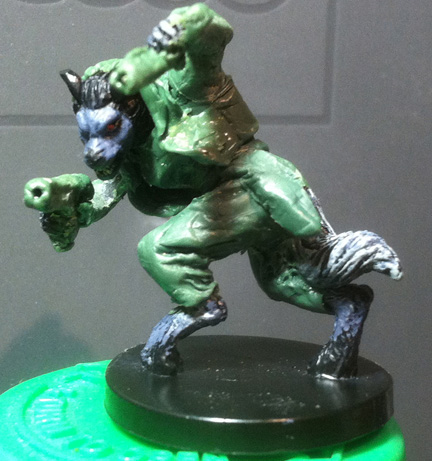 Vargr
don’t necessarily run around in the buff, so putting clothes on is the
next step (actually, this is a process best done in several steps).
Green stuff is both a joy and a pain to work with: a joy because it is
very malleable, not runny soft, and will hold its shape well; a pain
because it is very sticky and loves to hold fingerprints. When molding
pants, don’t forget to put in folds and creases. This can be done with
the modeling tool; dip the tool in water otherwise it too will stick to
the green stuff. You can also use the flat end to mash out finger prints
and move it into the hard to reach areas. The X-Acto can be used to cut
edges and if you want to run a seam somewhere. You have to wait 24 hours
after each step for the green stuff to fully cure. Then move to the next
section of clothing. From experience, don’t try to do the whole figure’s
clothing set in one day, as you usually need about half of the figure to
hold while working the green stuff on the other half. It is very
important to have a vision of what type of clothes the figure will have
so you know how everything should look. The files are useful to remove
excess bits, smooth out fingerprints, or put in a new crease.
Vargr
don’t necessarily run around in the buff, so putting clothes on is the
next step (actually, this is a process best done in several steps).
Green stuff is both a joy and a pain to work with: a joy because it is
very malleable, not runny soft, and will hold its shape well; a pain
because it is very sticky and loves to hold fingerprints. When molding
pants, don’t forget to put in folds and creases. This can be done with
the modeling tool; dip the tool in water otherwise it too will stick to
the green stuff. You can also use the flat end to mash out finger prints
and move it into the hard to reach areas. The X-Acto can be used to cut
edges and if you want to run a seam somewhere. You have to wait 24 hours
after each step for the green stuff to fully cure. Then move to the next
section of clothing. From experience, don’t try to do the whole figure’s
clothing set in one day, as you usually need about half of the figure to
hold while working the green stuff on the other half. It is very
important to have a vision of what type of clothes the figure will have
so you know how everything should look. The files are useful to remove
excess bits, smooth out fingerprints, or put in a new crease.
When creating something to put in the figure’s hands it is often
useful to have a firmer structure underneath the green stuff. For a gun
cut a piece of paperclip and bend it into a 90 angle. Put some green
stuff around it and then put it into the figure’s hand. Now comes the
tricky part, walk away for 15 minutes or so; when you come back the
green stuff will be a little more solid. You can use the molding tools
to shape a gun. You can also use smooth pliers to put a shape on both
sides.
 Poke
a hole in the end for the muzzle. Again, remember to wet your tools
periodically to keep them from sticking. Adding a belt (or strap) is a
matter of rolling a thin piece of green stuff and then stretching and
wrapping it around the figure. Smash down the roundness with your
molding tool. Holsters are a little tricky, green stuff does not always
like to stick to dry green stuff, so a dab of superglue will probably be
needed. I added a vest/jacket and used the pliers to pull edges away to
show movement and added back some hair on her head.
Poke
a hole in the end for the muzzle. Again, remember to wet your tools
periodically to keep them from sticking. Adding a belt (or strap) is a
matter of rolling a thin piece of green stuff and then stretching and
wrapping it around the figure. Smash down the roundness with your
molding tool. Holsters are a little tricky, green stuff does not always
like to stick to dry green stuff, so a dab of superglue will probably be
needed. I added a vest/jacket and used the pliers to pull edges away to
show movement and added back some hair on her head.
Finally when everything is molded the way you want it, you can paint it.
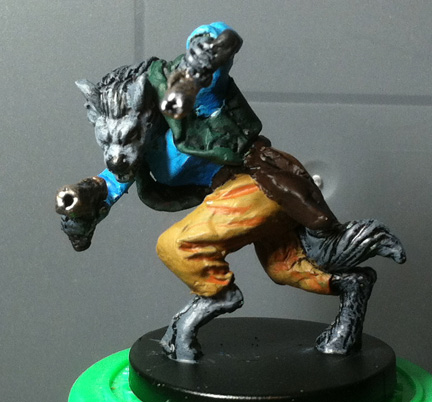
Tommy the Wolf Man was by far the easier conversion. Using the X-Acto I trimmed off the letter from the jacket and used the files to smooth the area down. I put a belt on him because I was already thinking ahead and wanted to add equipment to his belt.
I have a variety of weapon trees and chose an etched sword to put in to his hand. On test fitting the hand would have to be closed somewhat to better look like it was grasping the sword. I gently used the smooth pliers to achieve this. I also had a spare gun from a Tau Fire Warrior. I cut it down and also undercut it some more to give the appearance of a barrel. A little putty worked to make a clip. I tried a variety of test fits as to where I wanted to place the gun. I finally decided on an over the back sling and glued it into place.
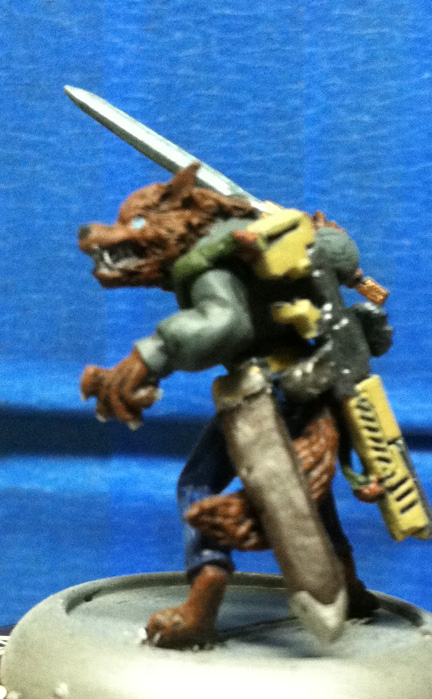 However
now I realized that his waist was becoming obscured. And I still wanted
to add a scabbard. I’ll admit the scabbard did not turn out exactly as I
wanted. I used green stuff to shape it but had to superglue it into
place. I guess when I did I did not realize I slightly bent it.
However
now I realized that his waist was becoming obscured. And I still wanted
to add a scabbard. I’ll admit the scabbard did not turn out exactly as I
wanted. I used green stuff to shape it but had to superglue it into
place. I guess when I did I did not realize I slightly bent it.
Painting Tommy the Vargr was pretty straight forward. There was not a lot of hanging clothes and hard to reach angles.
The overall results, with just a bit of care and planning, can be quite good, as you can see. You’ll need to develop your own techniques for all the fiddly bits, but ultimately, the core of the entire process is going to be learning to see the possibilities in the miniatures you start with.